Office of Steam Logo_1

Author Topic: PM Research Number 1 - Build Log  (Read 1701 times)

propforward

  • Jr. Member
  • **
  • Posts: 40
  • Location: Mid West USA
PM Research Number 1 - Build Log
« on: February 24, 2020, 08:41:10 pm »
This is my first engine from castings. I actually started this in the back end of 2018, but progress has been slow. Model Engineering has been my "second hobby" for a long while, but for various reasons it is moving up to number one spot, which was always the plan. Motorcycling is ramping down. Anyway, there now follows a catch up series of posts, copied from another forum I am on, and I hope you enjoy the journey.

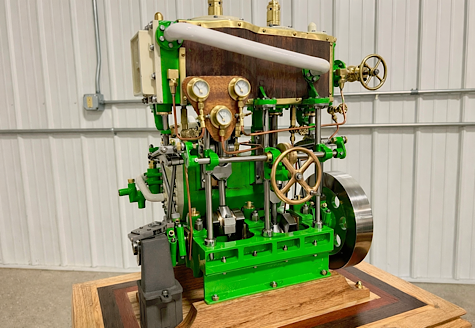
This is the advertised finished model, from the PMR site. It didn't grab me straight away, but has grown on me somewhat.


I bought this kit back in 2015, got waylaid a bit, but am finally ready make a start.

I'm sure this will be a slow project, but I am keen to tackle the challenges posed by a set of castings, and today I actually took that tentative first step.

Here is the kit


And, since a journey of 1000 mile starts with a single step, I'll start with this.


Got the 'ol hacksaw out, and separated these parts. This one is getting some attention today.


All I've done so far is square the sides up, and clean up the sealing surface.


Annoyingly, the camera makes the machined surface look a lot rougher than it is. Can barely feel the machining marks. Even so, I'll give this a clean up and polish.

Now with added holes. I'll call it a success - machined a new material (cast iron), and got the holes in the right place. The casting is a bit rough. I fettled it a bit on the corners but a little more clean up work needed there. The bosses for the screws nearly disappeared entirely, and I'm tempted to machine the top surface around the whole perimeter to clean it up, but for now I'll leave it as it is.


Well everything seems to be in order then.

propforward

  • Jr. Member
  • **
  • Posts: 40
  • Location: Mid West USA
Re: PM Research NUmber 1 - Build Log
« Reply #1 on: February 24, 2020, 08:41:43 pm »
I made a start on the outboard cylinder cover. A tricky item, being a somewhat thin casting. I turned the OD in 2 stages - from one end, then flipped around. I couldn't think of another way of doing it.

Since the part has to be machined down to a step, that more or less got rid of the line on the OD from the two stage turning, and the OD is close enough that when I clean and polish parts that mark will go away.


Mostly finished part. I actually need to skim the face and shave 3 thou of the small diameter. I didn't plan to do it this way, I had intended these turnings to be finished. However, since I am only a few thou oversize, I'll wait until the cylinder is done before dressing this up.


So I turned my attention to said cylinder. I have been scheming about this part for a while, so I decided to proceed.

Started by dressing some of the uglier bits of flash on the belt sander.


Then used a dead center to get the casting mostly straight in the chuck. There is plenty of material to get a clean bore, so this seems to be as precise as needed to start making datum faces.


I basically just did a minimum clean on each end, leaving plenty of material, to get parallel faces for holding in the mill. My plan is to get each end to length once the steam chest is made, and reference everything off that.


So I set the cylinder up in the mill. I used a height gauge to get each side of the steam chest area level before starting to clean up, then took the top close to the valve gland boss.


Then I started cleaning up the inside of the steam chest.


Now that I have straight edges, I can locate those accurately, and mill the sides and bottom of the chest to depth. Then I'll move on to the port slots.

Fairly happy with how things are going at this point.
Well everything seems to be in order then.

propforward

  • Jr. Member
  • **
  • Posts: 40
  • Location: Mid West USA
Re: PM Research NUmber 1 - Build Log
« Reply #2 on: February 24, 2020, 08:42:25 pm »
Well, I just got done milling the steam chest out, and I must say I'm happy with how this has gone. I had to put together a coordinate diagram for it, and then carefully keep track of my handwheel positions, because I don't have DRO's (not likely to add these in the foreseeable future), and also made sure to write down diagrams to remind me which way to turn the handles (sounds obvious but I've fallen foul of that before).

Anyway, I'm 2 thou over on the depth of the chest, which is within my general tolerance goal of ±0.005 so I'm pleased. Looks decent too, in my opinion.

Now I'm trying to decide how to center the slots in the bottom of the chest. I can easily do that from the sides of the steam chest, but then how to center the bore in relation to that? Need to give that some thought. I have a feeling that if I center the slots in relation to the casting OD, that everything will line up well enough. Have to double check dimensions on the valve etc, make sure everything will work if I do that. Also need to get some small milling cutters, so this is it for now. Got to go and do some  chores. Leaving the cylinder where it is for now, because I want to mill the slots, and also drill the holes for the cover before moving it.

Well everything seems to be in order then.

propforward

  • Jr. Member
  • **
  • Posts: 40
  • Location: Mid West USA
Re: PM Research NUmber 1 - Build Log
« Reply #3 on: February 24, 2020, 08:43:06 pm »
I spent the week mulling this over, poring over the plans, and decided that I didn't have my machining sequence optimized. What I failed to do, was interpret the relationship between the position of the steam chest floor and lip in relation to the cast boss on the inboard end of the steam chest. If I want the gland centered in that boss (and I really do), then it is best to machine the steam chest to that feature. That means boring the cylinder, then drilling at least a center hole position in the boss, and referencing from that.


Well before tearing down, I measured the height of the boss, then measured the lip and floor of the steam chest, and found that if I want to center the gland in the boss, I still have 0.024" of steam chest to machine away. That gives me enough material to go back to the lathe, machine the bore and outboard face, and then come back and true everything up and keep going, so no harm done.

I decided that since it was all set up, and that I am pretty sure I can get the faces of the cylinder true to the lathe chuck, I might as well drill the bolt holes. So I did, using the cover as a template.


So on to boring.

Except - that's a pretty new operation to me, and I haven't had a lot of success with it. Time to change that.

I spent a good bit of time on saturday reading up on making boring bars and bits. I discovered in the old, mostly crappy lathe tool kit that came with the lathe, that I had a 3/8" boring bar, with a 1/8" square HSS tool blank in it. Perfect!

I made several cutting tools, and had several attempts at boring out a piece of aluminum rod that I had left over from a project. It already had a 20 mm hole in it, so this gave me a good practice piece.

After several dismal attempts I shut up shop and spent a few hours doing more research. Armed with some internet pictures and some advice from books etc, I returned to the shop this morning, and had another attempt at grinding a tool. This is really tricky on a small tool blank, and doing it freehand, on my bench grinder which has very curved edges on the wheels, but I made this thing.


It doesn't look very impressive, but the clearances and rakes are more or less kind of sort of where they need to be.

A few test cuts in aluminum showed that if I make 2 cuts for each diameter position, I can get a good finish. My reading suggested this was necessary, to account for boring bar flex. The first cut tends to be a bit rough, but the second one cleans up well.

I still didn't want to rush on to my cast iron cylinder just yet, so I gave it a go in a piece of stainless pipe I had laying around.


The finish actually felt very good to me, so since I had everything set up I took a deep breath and decided to have a try at cleaning the bore.

Here is my set up


As you can see, I cut off the excess piece of tool blank from the far side, and I have to have a goodly amount of overhang of the tool bar. The bore has plenty of material to take out, so I felt OK making a start with a light cut to see how things went. If it went poorly I could abort and still save the part. I set up the cylinder in the chuck by using parallels behind it on the machined face, and pushing it against them using a dead center in the tail stock. This had the part running very true in terms of the machined cylinder faces relative to the chuck.

After a couple of passes, I judged that everything was proceeding satisfactorily enough, that it was time to make a bid for the 1.000" bore.

To help, I noted the crossfeed dial position each time, and measured the bore using a bore gauge and micrometer, noting the nominal cut taken and any error. I wanted to get a feel for variation in diameter so that I could account for that as I got close to size.


It worked out well. Certainly I sneaked up on the bore size, but I got it, and I think the finish is acceptable. (Hard to tell from the blurry picture).


The icing on the cake was testing the bore with this aluminum plug. The plug measures 0.999" on my micrometer, and it slid evenly through the whole cylinder, with no detectable play, and no binding as I pushed it through. So I'll call the bore good. I may hone it at some point, but I'll be honest, I feel like my machine set up efforts, and taking the time to test new techniques are really paying off.


Since it was all set up so nicely, I decided to face the cylinder to length on the outboard end. I did this by measuring from a scribed center on one of the side port bosses. The inboard end will be machined to length from this new turned face.


Finished outboard end. The machined away boss that end is not used on this engine.


Colour me happy.

While in the shed, I have also made a start on cleaning up the base. Just by using emery paper on my surface plate. I need to take a little bit more off, just enough to make the underside flat with some clean metal all around.


While digging around I found a nice piece of 3/8" thick aluminum, left over from some work project or another. I'll flatten the top of it, and use it as a jig plate to hold the base casting.


I also found this lovely piece of cold rolled steel, a chunk of which is going to be used to make some new boring bar holders, based on the documents kindly sent to me by Baner.


So, some success. I feel good about all this. Next step is to machine the inboard face and gland to length, then I'll get back to the steam chest and finish that.

One thing that is very apparent, is that I really need to make the grinding table for my bench grinder. I have Howard Halls book - Tool and Cutter Sharpening (Workshop practice series 38) which has a nice design in it. That will really help for getting cutting bits made properly, once and for all.
Well everything seems to be in order then.

propforward

  • Jr. Member
  • **
  • Posts: 40
  • Location: Mid West USA
Re: PM Research NUmber 1 - Build Log
« Reply #4 on: February 24, 2020, 08:43:55 pm »
 I am leaving the piston aside for now, although good progress has been made with steel finishes.

Today I reviewed the cylinder, and elected to continue. I had not yet machined the cylinder to length, so that was today's job.

First thing I did was just to check parallelism of the faces and the bore, to reassure myself they had been made correctly - which they had. I was happy about that.

Then I mounted the cylinder in the 3 jaw, with my Edge Technology chuck spider to hold it square, and machined the opposite face.


The gland boss in this picture has to remain proud of the cylinder face by 1/8", so I'm turning from the inside out. I had originally thought about milling this face, but this seemed a better technique in the end. It worked out fine - I got the length within 0.001" of print according to my micrometer, so I'll take that.


I decided to start work on the various bosses and slots. The gland boss still had about .013" to come off to get to the right length, and although I could have done that while turning the face, I finished it in the mill.


For Christmas, I got one of these handy dandy gadgets. I must say, it makes centering a bore or a rod on the mill an absolute breeze.


I then proceeded to center drill and drill the features on the gland boss.


Unfortunately the gland boss ended up slightly off center relative to the holes and the face of the steam chest. When I machined the steam chest I did not quite judge the height of the face right. I don't think this will matter in the end, just doesn't look quite perfect. The drawings were a little unclear in that regard. Part of the learning experience. They should really give a dimension from the center of the bore to the face of the steam chest.

I also cleaned up the faces of the port bosses, but decided bot to drill the holes just yet.


What I want to do next is mill the 3 slots in the base of the steam chest, so I started getting that set up.


This is as far as I got today. I need to level the steam chest, then I can find the center of the chest from the cylinder faces. I think I will actually clamp the cylinder in a V block or something though, so that I can find the center of the bore as well. I should have machined the slots when I had the cylinder set up for the steam chest perhaps, but I should be able to get where I need to.

Anyway, good to be working on the engine again, hopefully more progress tomorrow.

Well everything seems to be in order then.

propforward

  • Jr. Member
  • **
  • Posts: 40
  • Location: Mid West USA
Re: PM Research Number 1 - Build Log
« Reply #5 on: February 24, 2020, 08:45:07 pm »
Anyway, pressing on today. I set up with a very close fitting rod to let me locate the center of the bore.


Using the two clamps allowed me to adjust the level of the top machined surface of the steam chest (and therefore the base of the steam chest).

I aligned the V blocks supporting the rod to the Kurt vise using other V blocks - which worked really well. I did double check that the faces of the cylinder were parallel to the X axis of the table.


Clearance was a problem with this set up. It worked out fine for the larger slot, although I had to extend the milling cutter a way.


Got the slot done. I also noticed that I could clean up the one side of the chest a bit more, and put radii in the two corners. I may well do that at some point. Should have done a better job up front.


Of course - having finished it, I realised that the supplied drawings specify the slot with from the outside quadrants of the radius at the ends of the slot - whereas at work we always dimension slots from the center of the end circles - which is because that is most useful to the mill operator. So unfortunately this slot is too wide. However, I think it will still work. I'll make sure the valve suits the slot. And in future, I'll be more careful to check all dimensions on supplied prints as to how they are defined.

I'm also disappointed about the ridges in the slot, which are a result of milling the slot in stages. I wonder what I could have done to avoid these ridges? I locked down the cross slides when milling this, but maybe there is a backlash adjustment I need to make? Need to give that some thought.

So on to the smaller slots. And here I got in to some difficulty. I simply could not get close enough with my quick change collet holder, so had to resort to using the standard Jacobs chuck for milling the two small slots. I may have to obtain some standard R8 collets - or a better approach might be to make / modify some clamp bars to a lower profile for small work.

I did have to move clamps around throughout the process, but I managed to get the job done.


Finished:


Not the prettiest. Improvement needed of course. However, depth of the short slots was only 0.005" over nominal - so getting the hang of dealing with quill backlash, which is encouraging, and everything seems to be in the right place.

Close up of the ridges


I don't think these will affect the operation of the engine, but obviously I'd like to improve on that.

To finish up for the day, I put the side holes in.


I now face the challenge of making four porting drillings, at 20°, to port the two small slots to the bore. I started looking at the use of an angle plate I have, but did not get very far. I think I want to use the tight fitting rod to find the bore center to locate the ports. Anyway - more thought needed, and hope to put some time in on this tomorrow after getting my chores done.


I've got this, but I'm not seeing a way of using it and keeping access to the bore, which I need in order to position the ports. I think.


Thanks for looking. As usual - mixed feelings. Some things went OK, other things didn't turn out as well as I hoped, but I think I'm still looking at a functional cylinder to get to a working engine at this point. However, I'm desperately trying to make really nice looking parts, not just functional ones. I'll get there.


Well everything seems to be in order then.

propforward

  • Jr. Member
  • **
  • Posts: 40
  • Location: Mid West USA
Re: PM Research Number 1 - Build Log
« Reply #6 on: February 24, 2020, 08:45:59 pm »
Yesterday I fixed up my rotary table, and made a successful test, so today I went live with it.

I finished the step on the outboard cylinder head, so that it fit nicely in to the cylinder.


Then I turned it round and dressed up the outside a bit.


I decided on just enough clean up to provide a flat surface for the clamping nuts when the time comes. I felt it maintained the "cleaned up casting" look. Maybe it should be cleaned up a bit more. Don't know yet.


Anyway, on to the rotary table, and spotted and drilled the bolt holes.


Something got out of position, because when I went in to deburr the holes, the chamfers are definetely out of synch with the main bolt hole pattern. Not that they will be seen on the finished engine, but these kinds of errors and mishaps really grind my gears. Must do better than this. I bet I moved the slip ring 5 degree dial collar on the crank handle - it is only spring loaded, and has has no locking screw. I may well add one to try and avoid this.


I thought I would make a start on this part.


Cleaning up and getting ready:


Lots to do yet.

Anyway, something that has been bothering me is the backlash on my lathe cross feed. The cross feed just feels really slack, and then today the backlash seemed to increase on the main carriage. When I turn the dial on the carriage, the backlash gets taken up, I can feel everything engage - but then I can turn the dial a bit more, feeling a little more resistance, before it really starts to drive. I was worried that a gear might be slipping on a shaft or something, so I have taken most of the saddle and cross slide apart. I want to just make sure everything is set up right before going any further.


It will be good just to look everything over and make sure all is well. Seems like I spend more time setting up my machines than actually making things.
Well everything seems to be in order then.

propforward

  • Jr. Member
  • **
  • Posts: 40
  • Location: Mid West USA
Re: PM Research Number 1 - Build Log
« Reply #7 on: February 24, 2020, 08:47:46 pm »
Lathe is all back together - feels a little better now.


I've been reorganizing as well - moving some of my raw material off the wooden shelves, and sorting out tool storage there. Still got to do the lower shelf.

With the lathe back together I made some progress on the cylinder.

I mounted it on the angle plate. I used a 1-2-3 block as a stop, and made sure that was parallel to the table, then repeated the parallelism check on the face of the cylinder once I had it clamped in place.


I used an edge finder to find the center of the high edge of the bore, and then after a little trigonometry calculated the position of the centers of the two port holes, and spot faced them with a 1/8" end mill, then drilled down to the slot that was previously milled in the steam chest.


I am pleased that I hit the slots dead on - right at each end of the slot. It was a real fulfilling sense of achievement when I felt the drill break thru into the slot.

Now to turn it over and repeat on the other side. This part is actually close to completion! I hope to drill the other ports tomorrow, and do a little more turning on the inboard head.

I drilled the other two port holes today, but got them off center. They will still work, but I'm getting a bit tired of making parts "that will still work". Not sure where I went wrong - whether it was in finding center or if I just indexed too far when moving to the drill point. I'm not even going to post pictures, too embarrassing. I might go ahead and buy a new casting, on the basis that implementing what I've learned on the first one will make for a really nice second one, however I shall be extremely disappointed if I have to replace every casting in the kit.

Which brings me to my second issue of the day, and a real disaster.

I picked up the inboard head again, and was having a good time with it. I cleaned it up, got all diameters and faces true, and even drilled and reamed the through hole.


Then brought the disc to final thickness.


Got a lovely finish on it, and the thickness within .001" of dimension from the print. Great!

Proceeded to turn down the face some more to make the step, and that was going well, or so I thought, when suddenly my thickness measurements started moving around back and forth.........


Blast, and quite a lot of other words.

I don't really know how this happened. The part never grabbed, I was taking nice light cuts, everything seemed to be fine.

On top of that, I discovered while making this that there is still something wrong in the carriage of my lathe. The handwheel drive is not at all repeatable - go to move the carriage .020" - it moves .01 and change. Move it back down the bed and bring it back to zero, it ends up going past zero by .02" or more. So a key or a pin has broken in some gear or other in the saddle. I'll take that apart again before attempting to remake this.

At least organizing that area of the shop went well, and the cross slide adjustments worked well.

I'm not giving up. I'm going to finish this engine, and if I have to remake parts along the way, so be it.

Anyway, lathe is fixt. Found a sheared pin in one of the drive shafts.  :Mad:

Easy enough to fix, so that's something. And I have very quickly turned a piece of aluminium to replace the inboard head (not going to use the replacement casting just yet........). Will finish this after a bit of lunch.


Well everything seems to be in order then.

propforward

  • Jr. Member
  • **
  • Posts: 40
  • Location: Mid West USA
Re: PM Research Number 1 - Build Log
« Reply #8 on: February 24, 2020, 08:48:17 pm »
Got it up on the mill and put the bolt circle in.


First time I have aligned using the conical center finder, and it really works well, just using your fingers to feel the alignment. A quick check with a micrometer in two directions verifies location. You all know this of course.


The bolt hole pattern aligns very well indeed with the one I put in the outboard cylinder head, which pleased me to no end. Good test of repeatability of the rotary table and mill set up.

Then machined the snout to size. Parting off was a gentle and slowly slowly approach.


Then cleaned up and brought to size with a knife tool.


Turned the part around, and brought the part to final thickness.


Pretty happy with the final finish on that.

One last step to do, which is machine a step on that face. Hopefully get to that tomorrow.

Much better progress today. I’m sorry my posts aren’t a bit more interesting, but I'm working at the very basic end of the spectrum of model engineering, in terms of knowledge, experience and skill, but I'm having a good time, and even having some success - if not very consistent success, so I think that counts for something. Still going to make this engine run. Although that day seems a long way off yet.  ;D
Well everything seems to be in order then.

propforward

  • Jr. Member
  • **
  • Posts: 40
  • Location: Mid West USA
Re: PM Research Number 1 - Build Log
« Reply #9 on: February 24, 2020, 08:49:00 pm »
 I made a simple collet to hold the snout of the spacer.


I could only take light cuts, but this worked, and the part was finished.


I have been wondering about getting hold of a 3" chuck, which I could then hold in this chuck (a 6"), just to make it easier to hold smaller parts. I don't know if that's a good idea or not.

Anyhow, then I went back to my cylinder. I made a mandrel to hold it, and set up on rotary table in the mill. Here I'm squaring the steam chest, to get the bolt pattern properly aligned.


I did have to mill chunks out of my "nut" to allow clearance for my center drill, but I knew I was going to have to do that, in order to maintain some overlap and clamp the cylinder well.


I tapped the holes by hand, but using the mill to keep the tap square. I can disengage all the gears so that I can turn the chuck easily by hand.


Family shot, such as it is. 3 parts and a red headed step child.  ;D The bronze part that was ruined will go on the shelf marked "sacrifices to the god of machining".


And the cylinder head even fits.


I actually managed to get the holes for the outboard end lined up correctly. I thought I would have to skew them because of the poorly positioned steam ports this end.


It even fits the other end (although it doesn't go there). Just checking hole positions.


Well, that was good. Just got to tap the gland mounting holes and steam chest cover holes and the cylinder is complete. Now to decide which part to make next.

It seems like I only went to the shed 5 minutes ago, but 2 days seem to have slipped past.  :shrug:

It does take me a long time to make parts, but there’s a lot of other things going on as well.
Well everything seems to be in order then.

propforward

  • Jr. Member
  • **
  • Posts: 40
  • Location: Mid West USA
Re: PM Research Number 1 - Build Log
« Reply #10 on: February 24, 2020, 08:50:30 pm »
Milled out the pocket anyway. Got the size of the cutout within 0.005" on all sides, within 0.002" on depth and centered on the part within .002" each direction. Always good to see how close you hit the mark.


Thinking I'll polish up the main face on a surface plate before it goes in to service.

Then had a try at some flycutting. I have a piece of aluminum plate that I want to use for holding the chassis casting. I started sanding it flat a while ago, but it quickly became apparent that it was going to need a fair bit of material removal. So, I ground a tool according to the geometry I found on Toms Techniques website, and had a  try.


I don't know much about interpreting the cross hatch pattern, but I think this is not too bad. The casting no longer rocks on the plate, although I still have a bit more clean up to do on the underside of the casting to get it set down all around, but progress made anyway. Only problem being the cross feed motor died shortly after I started, which is a bit vexing, so I had to hand feed everything. Probably just a contact brush issue I think.

I made a start on the crankshaft tonight for no particular reason. It's just what I felt like working on.


Not sure I'm entirely happy with that set up, so I'll look at that again before any more turning. Probably put on a cutting tool with a smaller radius for a start.

Also tonight, a little more flycutting to level out both sides of my jig plate.


My cross feed drive broke down, and is under investigation. I can probably repair it - better that than $450 for a new one.

Well everything seems to be in order then.

propforward

  • Jr. Member
  • **
  • Posts: 40
  • Location: Mid West USA
Re: PM Research Number 1 - Build Log
« Reply #11 on: February 24, 2020, 08:51:26 pm »
More tinkerings. Replacement cross feed drive came today. It's wired incorrectly, such that it works in reverse. Will open it up and sort that at some point. Not a big deal, plus it was CHEEEEEP.


More importantly, I flattened the underside of the base casting. Levelled it first longitudinally along the regions I had given a light sanding on the surface plate. Crosswise it was about 0.007" off, which I figured was not enough to worry about, and in any cae with this set up I'm levelling the base relative to the (admittedly unfinished) slide rails. Seems like as good an approach as any.


Took off about 15 thou.


Still a couple of rough spots, but I don't think it's essential to take those out, I just want a good level surface around the whole perimeter.

Then set it up on my flattened aluminium fixture plate. Set it up so that it was as square as possible to the aluminium plate, using the slide rails and cylinder mounting face as references, as best as possible since they are not machined. Essentially "averaged" the position between the 3 surfaces, which should work well when I start cleaning material.


Yes, I did support under the extremes of the casting.


Then went around and drilled through the bosses, lightly spotting in to the plate below. Then removed the casting, tap drilled the plate, and tapped the holes to 4-40 thread.

Hey presto, base casting now on a holding plate and ready for machining.


I need to take a file to some of the flash first, but then I will look at setting up to machine the datum face where the cylinder mounts, once I have written out my operation sequence.


I decided to make a start on the base today.

I decided to start with cleaning up the end face. This is the datum surface everything is referenced from. My plan being to get this flat, then put all the holes in it, and use the center hole to locate the height of the slide rails, and also establish the center line for cleaning up the insides of the rails and the inner surfaces of the bearings for the crankshaft.


Although the drawing calls for spotfacing the end, that seems unnecessarily complicated to achieve - I suppose not much work with a boring head - but just milling it flat over a large enough area is simpler at this stage.


Then mounted it upright for the end face. I saw someone else mount one a bit like this, but I was concerned about how the plate would actually hold up. Thought I'd try it though.


I did mark up the end as a visual aid. I like to establish points from edges using an edge finder, and then center drill locations, rather than try center punching them. But I thought it might be a good sanity check to have this marked out to refer to.


Worked out OK. I actually found center by measuring the part, and then using an edge finder, and indexing from there, to keep the center point central, but my back up scribing was reassuring to have.


However, the plate did start to vibrate, so I decided to remount before going further.

I have this angle plate. I crudely set it up first


Then secured the fixture plate to the angle plate, and used the actual part face to get everything squared up, level and true.


I found center of the part again, using a co-axaial indicator, and then started spotting holes.


I used the geometry approach to establish the coordinates for the bolt circle pattern, which is very simple on a six hole pattern. My little Zeus book has these all predefined for easy reference.


Anyway, a bunch of counting of dial turns later, being sure to remember to take up backlash, and there we have it.


Test fit:


Which looks OK to me.

Then I spent a little time cleaning up the boss surface.


It seems to take me an exceptionally long time to set jobs up. For instance setting up the angle plate and getting the face of the base casting level and true was about 2 hours. But maybe that's just a matter of practice. At this stage I'm more interested in getting the set up right, than how long it takes to do it. I'm pleased with the last few workshop sessions results.
Well everything seems to be in order then.

propforward

  • Jr. Member
  • **
  • Posts: 40
  • Location: Mid West USA
Re: PM Research Number 1 - Build Log
« Reply #12 on: February 24, 2020, 08:52:58 pm »
I made a pin to fit to the center hole, with the idea of using it to locate the hole and therefore allow me to mill the rails accurately.


Then I started milling the insides of the rails.


After an initial cut, I located the center of the hole again, and took a measurement to the top of the casting surface of the rails, to get a feel for how much I was going to need to remove.


That technique worked well enough, but in the end I actually touched off the bore of the hole with the height gauge rather than using the pin.

Anyway, cleaned up the rails


I made a bit of a meal of this, with multiple set ups I didn't need, if I'd actually thought through it a bit better. I ended up taking the casting out, and turning it sideways to check the inside rail to bore center dimension using my height gauge. I was a bit worried I'd messed up because at this stage the rails were very uneven. However, it turned out I just needed to take more off one rail.

I set it all up again, and finished up.


Then drilled and tapped the upper rail mounting holes.


As far as I can tell, I'm within .001" on the width of the rails, with the centerline of the rails maybe within 0.003" of center line of the bore, and height of the rails is within .001" of nominal, so not a bad go at it.

Got to think about how to do the bearing caps and crankshaft bearing holes now, so I may move on to something else tomorrow while I mull that over.


That brings me all up to date. From now on, I'll be posting as and when I get time to work on the engine - which is never as frequently as I like, and I don't move very fast when I do get the time. Such is life!
Well everything seems to be in order then.

Stoker

  • Global Moderator
  • Hero Member
  • *****
  • Posts: 3716
  • Wherever you go ......... there you are!
  • Location: Eastern Sierra
Re: PM Research Number 1 - Build Log
« Reply #13 on: February 24, 2020, 11:40:40 pm »
An epic thread, with full disclosure and well detailed photos!

This is excellent!!!
"Information is not knowledge, Knowledge is not wisdom, Wisdom is not truth, Truth is not beauty, Beauty is not love, Love is not music: Music is THE BEST...   
Wisdom is the domain of the Wis (which is extinct). Beauty is a French phonetic corruption of a short cloth neck ornament currently in resurgence..."
F. Zappa ... by way of Mary, the girl from the bus.

txlabman

  • Global Moderator
  • Hero Member
  • *****
  • Posts: 3661
  • Location: Plano, Texas
Re: PM Research Number 1 - Build Log
« Reply #14 on: February 25, 2020, 05:13:04 am »
Fantastic build thread.

A lot of great information.

I appreciated your candor in the narrative.

Lots of trial and error, but some great problem solving along the way.

Thanks for sharing! 🤠